
Making Memories
Originally published in Barbara’ column in Crafts ‘n Things magazine (1989–1999) as a how-to project, this creative project illustrates how to transform an antique typesetter’s tray into a unique memory box of your life or someone you love.
Picture Your Life in a Typesetter’s Tray
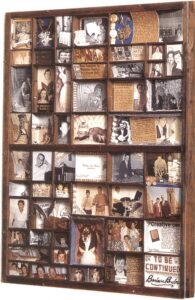
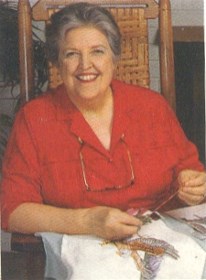
WHEN I WAS ABOUT FORTY-FIVE, I bought an old typesetter’s tray in a junk store for $5. It was literally falling apart and I had no idea what I’d do with it, but it spoke to my heart. I thought about that tray for months, and one day I got a flash of creative inspiration that soon had me off and running on one of the most interesting craft projects of my life. I spent weeks planning, designing, and creating the nostalgic keepsake pictured here, but it was time well spent.
This memory box hangs on one side of the long hallway I walk through a dozen or more times every day to get to the kitchen and living room. Keeping it company are four other memory boxes that constantly remind me of all the happiest times and dearest people in my life. This nostalgic “wall of memories” will be a comfort to me as long as I live. I’m sure a memory box of your own life or someone you loved would do the same for you.
Tray Selection
A variety of antique and reproduction trays are available. Before buying, plan how you will keep your memory box dust-free when completed. (I simply had a sheet of Plexiglas cut to size, and then drilled tiny holes in it so I could screw it into the frame of the finished box.)
Picture Selection
In selecting photographs, pick those that bring back a flood of memories—snaps that show you growing up, at work or play, with special friends, family members and favorite pets. (Before cutting up your original photos, be sure to scan copies for safekeeping or make copies at Kinko’s or some other copy center.)
Mementoes
Gather precious small keepsakes to include with some photos. For example, my box includes my baby ring (which first belonged to my mother); school pins and medals; newspaper clippings; a 50-cent “diamond” my husband gave me as a joke; a piece of fur from our dog’s favorite toy; a tiny seashell from my mother’s collection; a “Love” charm from my dad, and a carving of a mule that reminds me of how stubborn I’ve always been.
Arrangement
Experiment by laying pictures on a large piece of heavy cardboard in the order in which you plan to place them in the box. Figure the sizes to which each picture must be trimmed, based on the size of the individual boxes in the tray. Do final trimming of pictures only when all the individual boxes have been modified to fit your requirements. (See next step.)
Tray Modifications and Finishing
To accommodate different sized photos, you will have to remove some of the tray sections. (Add glue to stabilize the tray as you remove supporting sections.) Finish the tray with stain or varnish of your choice.
Photo Placement
Place photos in different ways, slanting some from side to side, angling others from front to back or curving one or two. Glue other photos flat to the back, or to pieces of Styrofoam cut to desired thickness.
Box Trims
Line the back, sides, or bottoms of individual boxes with appropriate fabrics, laces or trims. For example, with my wedding pictures I’ve included some of the lace from my wedding veil and tiny flowers from the cake decoration; Grandma’s box has a piece of her crocheted lace; one of my “glamour shots” has a strip of rhinestones from the fanciest pair of shoes I ever owned, while sheet music trims the boxes of my husband, a professional musician.
I hope these tips will inspire you to create your own memory box because I know it will give you enormous pleasure in the making and be a continuing joy to you and your family for years to come. Children grown and gone? Think about putting some of their childhood/growing-up photos into a special memory box for each of them for Christmas this year.
Copyright © 2003, 2021 by Barbara Brabec
RELATED ARTICLES:
My Memory Box of Life with Harry Brabec. This project was essential to Barbara’s emotional healing as a grieving widow and one that will inspire many to create a memory box of a loved one. Includes ideas and tips on how to combine memorable photos with a loved one’s personal possessions.
How to Make a Father’s Memory Box: An idea for a unique gift you can make for your father, or for yourself in remembrance of him.
Back to
Creative Endeavors T/C